If you have AVI movies that you are tired of watching on your PC’s small screen, and, in addition, you don’t want to write them to a CD because of the loss in quality. If you have a DVD drive and a DVD player, it’s easy to Burn AVI files to DVD and then watch them on your TV set. Here’s how to convert your AVI files and Make them into a DVD. The most incredible thing about this is that the required software is absolutely free, and performs better than most of the paid versions I’ve seen!
You Will Need
A DVD-Writer for burning the DVD. As of now, DVD-Writers are considerably cheap. The software, Avi2DVD, which is a freeware can be found at Here : Download AVI2DVD.

The Input
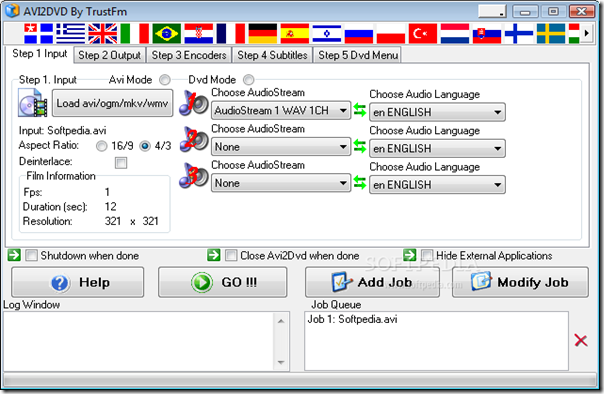
Post installation, firing up the software brings up a single window interface, which is akin to Nero’s info tool. This is the command centre for all the encoding. There is an option to select from two input modes like AVI or DVD.
Since you would like to convert existing AVI files to DVD, you will need to choose the AVI mode. Interestingly, in the AVI mode, the software takes not only .AVI files, but also .OGM (Ogg Media files) and .MKV (Matroska Video files).
The Output
Here, you can select the output format for your movie file. You can choose between DVD, SVCD and VCD. Then, using the drop-down menu, you can select the disk size that you are using. This ranges from 740 MB for a CD-ROM to 8.5 GB for a dual-layered (DL) DVD.
Remember, to burn a DL DVD, you need to have a DVD-Writer that supports DL writing, as well as compatible media. You can also specify the screen aspect ratio—16:9 for wide-screen TVs, or 4:3 for regular TVs. The software even allows you to specify the video format – NTSC or PAL (PAL is the standard used in India).
A thoughtful addition is the ability to specify the number of disks you want to spread your movie across, the software splits the output file accordingly!
Encoding
Once you have selected the output mode, you can select the codec you would like to encode your movie with. Incidentally, the software offers four encoders by default. These are QuEnc, NuEnc, FreeEnc and HCEnc. All these are freely available, so you need not worry about payment or copyrights. They get installed with the software.
In my tests, I found that that the encoders provided do a pretty good job. There are also various options such as VBR (Variable Bit Rate, which reduces file size without noticeable loss in quality), an option to set the output to High Quality with one click, and an option to set the number of passes for your movie encoding. The more the number of passes, the better the output will be.
If you are making a DVD, the software even allows you to add subtitles to the movie. Moreover, you can select font type, size, colour margins, and even the language!
Using the software does not lead to any audio quality loss, and retains the number of channels your original file had.
Burn It!
Once you have encoded your file, navigate to the directory where you saved the original file. You will find a folder called Avi2DVD_temp (or whatever folder name you specified).
Inside this, you will find the .CUE files. I have already discussed about burning BIN files without CUE Files. Burn these using your favourite writing software. I recommend a Free CD/DVD Writing or Burning Software called IMGBURN, and your DVD is ready! Enjoy your movies on your TV screens.

It’s a shame you don’t have a donate button!
I’d definitely donate to this brilliant blog! I guess for now i’ll settle for book-marking and adding
your RSS feed to my Google account. I look forward to new updates and
will share this website with my Facebook group.
Talk soon!
My partner and I stumbled over here by a different web address and thought I may as well check things out. I like what I see so i am just following you. Look forward to looking into your web page for a second time.
The link above let me install an “unregistered” version which left a “watermark” right in the middle of the screen. If I want rid of that, it cost $40! So much for ‘free’.
i dl avi2dvd but wen it coms 2 picking an audiostream the box is blank an i dont know how 2 sort this problem.. i cant get any further than this b’cos of the blank audiostream box with nothin there 2 pick.. can any1 help please
hi i would like to convertor an italian film with russian narrator,but want to delete the narrator,any help ps
I tried avi2dvd and the vieo works just fine. The audio which was loaded on to my music files on PC and then used on Photostory 3 seemed fine but only lasted just under a minute. Strange thing was I saved the program after making the DVD, and on playback via Media player it played all the files.
with avi to dvd creator for mac, you can easily convert and burn avi movie video files to dvd on mac os x.
Resource: http://www.mac-dvd-software.com/mac-dvd-creator.html#131