Previously we discussed a way to Hide hard drive partitions using Command prompt. Now we are discussing about hiding more than two ways to hide hard drive letters that appear in My Computer: via the Registry Editor and via the Group Policy Editor. These methods will hide the partition and will not show them in Windows Explorer. The 2 methods are explained below..
Method 1: Via The Registry Editor
Open the Registry Editor. Navigate to the string
HKEY_CURRENT_USER\Software\Microsoft\Windows\CurrentVersion\Policies\Explorer
-
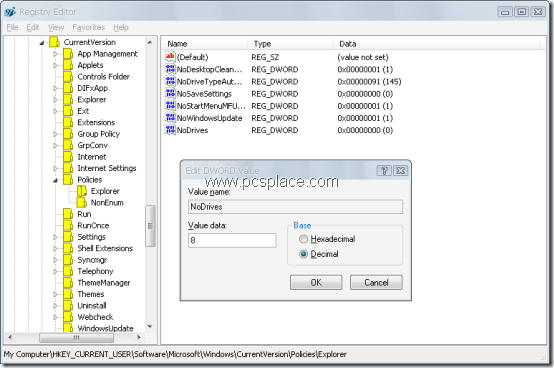
Create a new DWORD value and name it NoDrives. All drives will be visible as long as this value’s data is set to 0.
-
Set the value for NoDrives according to the following list:
Drive Value
A: 1
B: 2
C: 4
D: 8
E: 16
…… …
Z: 33554432
All drives 67108863
-
Enter the decimal number corresponding to the drive(s) you want to hide as the NoDrives value data.
-
When you right-click on NoDrives and choose Modify, make sure you select Decimal, not the Hexadecimal.

To hide multiple drives, just add the drives’ values. For example, if you want to hide both drives A: and D:, the NoDrives value should be 1 + 8 = 9. Using the same decimal values, you can arrange for a different behavior that will leave a drive visible, while making it impossible for a user to view the contents of the drive. It will also prevent him from using the commands Run, Map Network Drive, or Dir to view the contents of folders on the drives.
To do this, Create a new DWORD value called NoViewOnDrive and use the same values as above.
Method 2: Using The Group Policy Editor
This method can be used only on Windows XP Professional Edition.
-
Open the Group Policy Editor (Start > Run, type in “gpedit.msc” and press [Enter]).
-
Go to User Configuration > Administrative Templates > Windows Components > Windows Explorer.
-
Here, you’ll find “Hide these specified drives in My Computer” and “Prevent access to drives from My Computer”. The difference between the two settings is that “Prevent access” will allow the user to see the drive icon, but will give an error message when he tries to access it. “Hide”will remove the icon so the user won’t see it, but the drive can still be accessed by using Start > Run and keying in the drive letter.
-
Under this setting, after you click the radio button next to “Enable”, you’ll see several options. Choose the one you want to apply, for example, “Restrict A and B drives only”.
-
You’ll notice that the options here are restricted; you cannot, for example, choose to restrict drives A, B and D.

Thanks man, this was one of the best tutorials I have read.
I used the registry method and it worked like a charm.
67108863 thumbs up!!! :-)) XD LOL respect
Wow, very good share. Credit on behalf of this!
Thanks a lot for this valuable information, I share my computer with my friend and my personal data is in D: drive, although I have created a limited user account for my friend, still he was able to access my data on the D: drive, now I know how to hide my valuable information. Thanks again !! 🙂
Cheers,
Alok
Thanks for this method.
My question is that if we forget the registry key when we hide the folders or drive then how can we access these drives with alternate method if you have please tell us i will be thankful to you.
Thank you for posting post these methods in one place, now it will be easier for me to ask question, Will these methods restrict from accessing the drives from Command Prompt?
Two types of Hardisks are:- SATA and PATA.