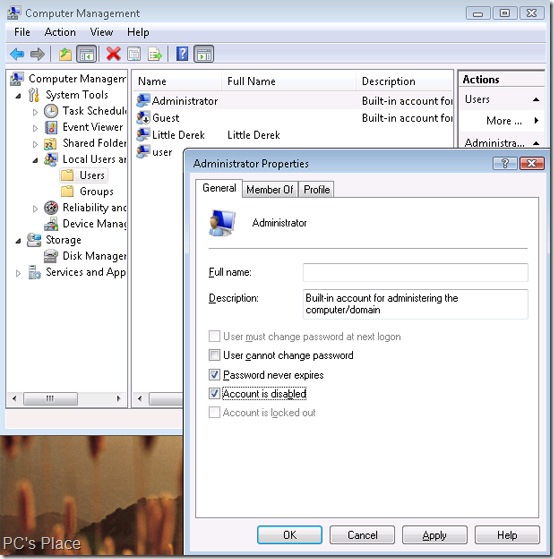
If you have been getting a lot of confirmation requests while performing any system configuration changes, the Administrator user account must be deactivated. Vista installs the special user ‘Administrator’ for extreme system configurations. The advantage of the admin account is that the many annoying confirmation requests that appear when performing changes in the configuration are absent.
This is the default setting in Windows Vista which can be changed very easily. To activate the administrator account, simply follow these steps:
-
Register an account with administrator rights and open ‘Start > Control Panel’.
-
Then click ‘System and maintenance’, ‘Administrative tools’, start the ‘Computer Management’ and confirm with ‘Next’.
-
Now open ‘Computer management (local) > System > Local User and Groups > Users’ on the left hand side pane.
-
You will see the ‘Administrator’ entry among others on the right. Double-click on it and uncheck the box in front of ‘Account is disabled’.

The administrator icon appears on the welcome screen after you click ‘OK’, and restart the computer. Click on it and enter a password under ‘User Accounts’ in the control panel. Logon using the Administrator account.
DISPLAYING THE ADMIN ICON:
If the admin icon is not visible immediately, you’ll need to make some adjustments in the registry.
-
In this case, register an account again with computer admin rights and start the registry editor with ‘Start > All Programs > Accessories > Run’ and ‘regedit.exe’.
-
Now navigate your way to the ‘HKEY_LOCAL_MACHINE\SOFTWARE\Microsoft\Windows NT\Current Version\Winlogon\SpecialAccounts’ key.
-
Create the key if it does not exist. You can create a new key by going to ‘Edit > New > Key’. Another key called ‘UserList’ should exist under ‘SpecialAccounts’.
-
Create it in the same way if otherwise. Then select it and create another entry with ‘Edit > New > DWORD value (32-Bit)’.
-
Overwrite the name which is suggested by Windows with ‘Administrator’.
-
Double-click on the value thus created and enter ‘1’ in the ‘Edit DWORD value (32-Bit)’ dialog under ‘Value’. Now close the registry editor with ‘File > Exit’ and you are done.
