Have you ever wondered if there was some way you could record memorable IM video chats you’ve had with your friends or family? What about important webcam video call conferences with clients? Using a Software you can record Skype, MSN, Live, AOL, Aim, Yahoo or any messengers video chats. It also lets you capture audio and video, pictures of anything on screen. Here is the procedure to record your Video Chats , Web Cam Sessions or Video Call Conferences..
What You Need
To be able to record your video conferences, irrespective of the chat client you are using like Yahoo, MSN, Skype etc, you need to download a free utility called ‘Bulent’s Screen Recorder’ It will do everything. Let us know how it works.
Startup
Starting the software after installation will get you to the default window, and the default settings are more or less sufficient for most recordings.

Configuration
The software offers a pretty comprehensive list of tweaks for your recordings. Click on the configuration button, and you will be presented with a rather haphazard configuration window where you can manage the various settings for your recordings. The default capture quality is set at 10 frames per second (fps), which you should change to the value you would like, most movies are encoded at 30 fps.
Apart from the capture rate, it also lets you select the compression you want to use, as well as set the compression rate using a simple slider. You can also set hotkeys to take screenshots, and set a file size
limit for recording, wherein the recording will stop as and when the file size is reached.
Recording
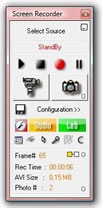
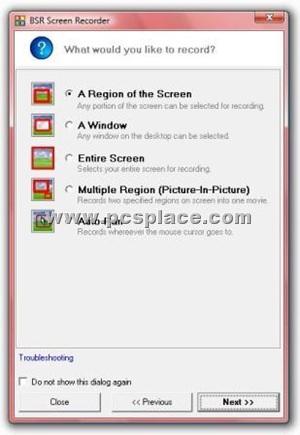
First of all, you need to choose the source from which you will record. Click the ‘Select Source’ button on top, and then select from amongst the options of ‘Entire Screen’, ‘A Window’, which can be any open window on your desktop, ‘A region of screen’ which can be set by you, or your handycam.

The last mode ‘Auto Pan’ records where ever your mouse cursor goes to. To record video chats, select the source as ‘A full window’, set window as MSN or Yahoo! video chat window.
Continuous Recording
Once the source has been selected, you can start recording by clicking on the handycam button. This is the manual record and you need to keep the button pressed (by holding down the mouse button) to keep recording. The moment you release the button, it will stop recording.
To keep recording continuously, you should first click the handycam button, and then click the arrow on the top left. This will make your recording continuous until you press the ‘Stop’ button.
Playback
On pressing the ‘Stop’ button, you will be provided with various options of ‘Save’, ‘Play’, ‘Photo’, or ‘Studio’, the last of which lets you edit your AVI file. Clicking ‘Play’ will open your default AVI player and play the file.
Image Capturing
The button next to the handycam button that looks like a still camera is just that! Once you stop your recording, you can view these snapshots by clicking on the green button labeled ‘photo’. That’s all there is to it.
You can explore various options available there like editing Audio, Video settings, setting up watermarks, converting videos etc. You can now have video chat logs and say goodbye to boring old text provided you have broadband, of course!

Thanks for the auspicious writeup. It actually used to be a enjoyment account it. Glance complex to far delivered agreeable from you! However, how could we keep in touch?
Heuu