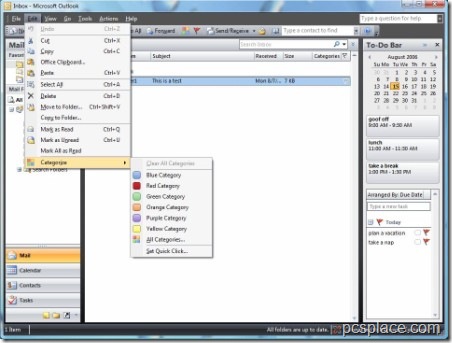
It is getting more and more difficult to manage the ever increasing flood of e-mails in your inbox. This is an option which you can use to automatically identify and categorize selected mails using colors. Outlook 2007 can allocate mails to any, even self-defined categories as soon as they arrive, and mark them with a color in the inbox. One glance at the inbox suffices to know whether there are any important mails. Now, you will never miss important mails unlike in case of rule-based moving of e-mails in folders. Here is the procedure to make it happen..
Integrating Categories in Inbox:
First of all, make sure that the ‘Categories’ column is displayed in the inbox. For this,
-
Right-click the line with the column titles and open the ‘Field selection’ context command.
-
Select ‘All email fields’ in the combination field and pull the ‘Categories entry in the column titles of the inbox.
-
Now close the ‘Field selection’ dialog.
-
Right-click a mail in the ‘Categories’ column.
-
The context menu lists the defined columns and colors.
-
Link these with the e-mail with a click. If the mail already belongs to this category, this action deletes the allocation. You can allocate different categories to one mail.

NOTE: You can assign an expressive name to the colored column during the first allocation. With ‘View > Sort by > Categories’, the inbox is displayed as grouped in the categories that you have defined. The ‘View > Sort by > Date’ command takes you back to the original default view.
Automatically Allocating E-Mails :
The automatic allocation of mails landing in the inbox to defined sub-groups is extremely useful. To activate this function,
-
Open ‘Tools > Rules and Alerts’.
-
Here, click ‘New Rule’.
-
Select the ‘Check messages when they arrive’ entry under ‘Step 1: Select a template’ and select ‘Next’. On the following page, you can determine the conditions an e-mail must fulfill for a particular category.
-
Here, activate the ‘with specific words in the sender address’ option and click on the ‘specific words’ link in the lower part of the dialog.
-
In the next dialog, enter the sender address ‘ebay@ebay.in’, click ‘Add’ and then confirm with ‘OK’.
-
Click on ‘Next’ and select the ‘assign this to category’ option.
-
Then click the ‘Category’ link in the lower part of the dialog and check the checkbox in front of the desired category ‘eBay’ in the ‘Color Categories’ dialog.
-
Confirm with ‘OK’ and click ‘Next’ in the rule wizard.
On the following page, you can define exceptions. If you do not want to categorize command conformations, or if you want to categorize them differently, activate ‘except with specific words in the reference’.
-
Click again on ‘specific words’ in the lower part of the window.
-
Enter ‘Command confirmed’ in the following dialog, click ‘Add’ and ‘OK’.
-
Then select ‘Next’ and enter a name for this rule, ‘Categorize eBay’ for instance, in ‘1st step: enter rule names’.
-
Before closing the wizard with ‘Finish’, make sure that the checkbox for ‘Activate this rule’ option is checked.
In order that the automatic allocation functions well, set the default Outlook rule ‘Delete category of emails (recommended)’ before all other rules. Otherwise, it would again delete a category allocated later. Select the appropriate entry in the ‘Rules and Alerts’ dialog and click the up arrow till the default rule is at the top of the list. Confirm with ‘Apply’ and ‘OK’. There, you are welcome to a more convenient and colorful inbox!
