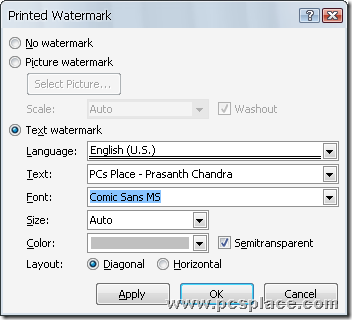
Watermarks are text or pictures that appear behind the text. They can identify the document’s status, marking a document as a draft, for example. You can use graphics or text as printed watermarks, which will appear after you print the documents. These are used in order to identify the documents and also you can protect your docs from being used by anyone. To add a watermark to a printed word document using Microsoft Word application,
-
In Office 2003, Go to Format > Background, and click ‘Printed Watermark’.
-
In Office 2007, Go to Page layout > Custom Watermark
Then do either of the following:

To insert a picture as a watermark, click ‘Picture watermark’, and then click ‘Select Picture’. Select the picture you want, and then click ‘Insert’.
To insert a text watermark, click ‘Text watermark’, and then select or enter the text you want and adjust the settings like font and orientation etc.
-
Now select any additional options you want, and then click ‘Apply’ and then ‘OK’.
-
To view the watermark as it will appear on the printed page, click go to View > Print Layout.

Adding watermarks to documents is even easier with a Word add-in called “StampIt for Word.” There’s a fully functional free trial at http://www.stampitnet.com that completely automates the process along with a number of other functions.