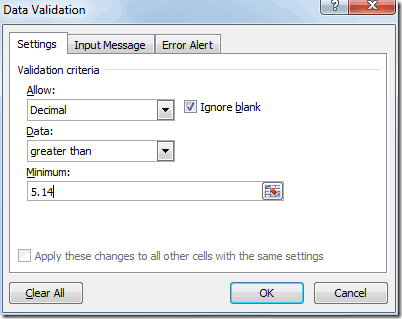
Sometimes the values or the entries in a worksheet of an Excel file may not be inputted according to the required specifications. You can avoid it by defining validation rules for worksheet entries and can restrict an entry to particular, allowed values. Thus, the data entries entered into your MS Excel document can be allowed only when it meets the required validations. For this,
-
Select the cells for which you want to define the validation rules and open ‘Data > Validation’.
-
In Excel 2007 click on ‘Data Validation’ in the tab ‘Data’ of the multi function bar.
-
In the subsequent dialog you can define the validation rules, write automatic help messages and define error alerts.
-
You select the validation rules on the tab ‘Settings’, in the combination field ‘Allow’. The default ‘Any Value’ allows the user arbitrary entries.
On the basis of your selection further fields appear with the help of which you can refine the rule. So the rule ‘Whole Number’ for example, allows via ‘Minimum’ and ‘Maximum’ the entry of a range in which the entered number must lie. The rule ‘List’ is particularly interesting, with which you can limit the entry to a particular number of possibilities. You list these in the field ‘Source’ and separate each entry with a semicolon.

The problem described at the beginning can be avoided by defining the specification ‘Yes; No’ in ‘Source’. Also activate the option ‘In-cell dropdown’. Then Excel shows the user the allowed entries in a drop down field.
All rules can force the entries. For that remove the check in front of ‘Ignore blank cells’. Additionally you can activate the option ‘Show input message when cell is selected’ on the tab ‘Input Message’. The message, regardless of whether it is an explanation of the possible entries or the meaning of the information to be entered, can be described in the self descriptive fields ‘Title’ and ‘Input Message’.
The message then appears as quick info as soon as someone selects the cell. Lastly, on the last tab of the dialog, ‘Error alert’, you can give a hint to the user, who does not follow the rules. This hint appears in a simple dialog which you can describe with ‘Style’, ‘Title’ and ‘Error Message’.
Tip: When you select the ‘Style’ as ‘Warning’ or ‘Information’, Excel offers the user the possibility to quit the hint with ‘Yes’ or ‘OK’, after which the spreadsheet still accepts the wrong entry.

Terrific put up. Hope you write additional around the subject soon.