Time Machine on Mac is one of revolutionizing features ever offered on any Operating System. Mac is known for its amazing and incredible features, and Time Machine is one of them. So, if you need some help to setup Time Machine on Mac, then here is an article for you.
Why would you actually need Time Machine to be setup on your Mac? Well data has become one of the most precious thing in this cyber age and we seek for means to backup data and restore it back when required.
How To Setup Time Machine On Mac – Guide
Now you have two options to use a drive for setting up Time Machine on Mac. You can either go with the partition on your Mac, but I would recommend you to use an external hard disk as it makes sense having a backup on external source.
So just plugin in the external hard drive in case you are going with this option. And you can use the Thunberbolt Cable in order to pace up the whole data transfer.
Now launch the Time Machine utility from the Dock on your Mac and it would instantly ask you if want to go ahead and setup it. So click on the button labelled as Set up Time Machine.

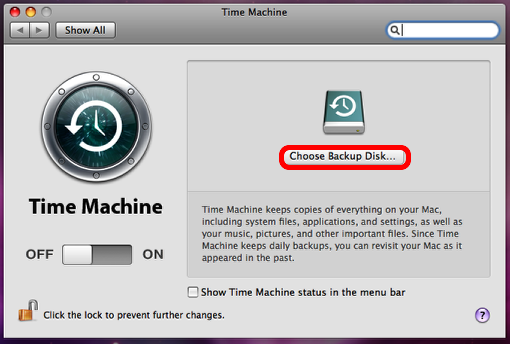
Now first thing that you need to do is tell the Time Machine about the drive that you would be using as the Backup Disk. Click on the Choose Backup Disk button and select the hard drive that you want to choose as the backup drive and click on Use For Backup button.
Now bring the slider to ON and check the Next Backup status, as the Time Machine would backing up the files once the counter reaches zero. And it would be better if you could leave your Mac for a while once the backup starts as it would take some time.
Once the backup is done, you can check the icon for your hard drive as it gets turned to green and has time machine symbol on it. And it is always recommended to lock the time machine as you do not want anybody to change its default settings. So, just check the Click the lock to prevent further changes on its interface.
That is it! This is how you can setup Time Machine on Mac and use Time Machine to restore back your Mac.
