Here is a tutorial which lets you connect Mac to PC so that you can transfer files. All you need is a Macbook, desktop PC, Ethernet cable which will allow you to share and transfer files from your Mac to PC or PC to Mac.

And yes, we will not use USB drive or some other storage device to transfer files from your Mac. So here is the step by step guide which would help your connect Mac to PC:
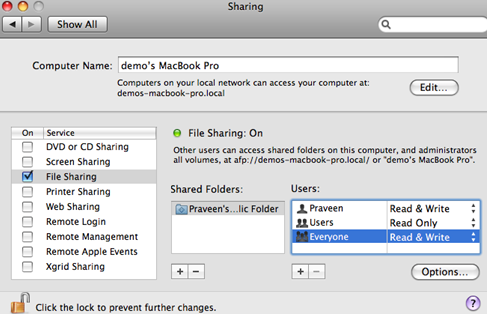
STEP 1: Navigate your Mac to System Preferences > Sharing. And here, make sure that you turn ON the File Sharing option.
STEP 2: Here, you need to make little changes which are changing Everyone users to Read & Write. This is an important step as it actually enables you to share / transfer files from Mac to PC and PC to Mac.
STEP 3: Now, you can find the button labeled as Options and there you need to choose the Share files and Folders using SMB option.
STEP 4: Now, click on the check boxes of the accounts that you to share files.
STEP 5: Now navigate to System Preferences > Network Control. Here, your Mac will automatically give you some IP address.
NOTE: Make sure that you note down that IP address somewhere as you would need it while you try to connect Mac to PC in order to share and transfer files.
STEP 6: Now, its time to operate your desktop PC. Navigate to Start > Run and in the field given, enter the IP address that you got from your Mac starting with two backslashes ( \\ ).
\\IP ADDRESS
Voila! You are done with the procedure to connect Mac to PC. Now you will directed to a window on your desktop PC just like a normal folder which is actually the Public Folders of your Mac. From here, you can share and transfer files from Mac to PC or vice versa.
