A PC can be optimized for your own intended use by making changes in the registry. We discussed a lot of Registry tweaks and edits which will unlock new features in your Operating System or customize the Windows Xp, Vista or Windows 7. What if you want to transfer registry optimizations quickly and easily on other systems? Here is the procedure to back up and restore your registry, export or shift the registry changes to other computer.
-
Open ‘Start > Run’ in Windows XP and enter ‘regedit.exe’. In Windows Vista and Windows 7, click ‘Start’, enter the ‘regedit’ command in the ‘Start Search’ field or ‘Search Programs and files’.
-
Right-click the tool entry in the ‘Search Results’ and select ‘Run as administrator’ context command. If you execute this action from a normal user account, you have to specify an account with administration rights in the next dialog box and type the password for it.
CREATING A REGISTRY BACKUP:
Create a backup first, using which the system can be reset in case something goes wrong.
-
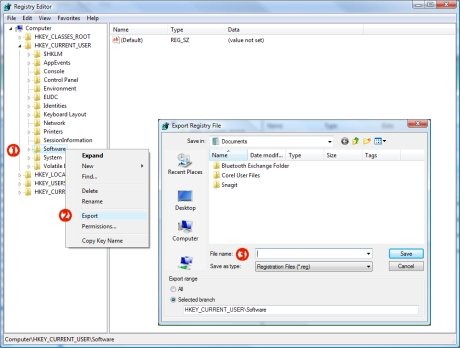
For that, select the relevant key in the tree structure on the left side.
-
Then open the ‘File > Export’ command and select a folder and name for the backup in the following ‘Export registration file’ dialog box.
-
Use the ‘All’ option in the ‘Export area’ for creating a complete backup. On clicking ‘Save’, the registry editor secures all the desired information in a normal text file, with the ‘.REG’ extension, which you can edit with text editor.

EXPORTING A PARTIAL STRUCTURE:
Make the desired changes in the registry and ensure that the system works as if it were upgraded. For transferring these settings, it is enough to export the relevant key from
the registry and run it on the target system. Select the requested branch on the left in the tree structure and call the dialog box again. However, you will need to select ‘Selected branch’ as the export option from the ‘Export range’.
TRANSFERRING REGISTRY VALUES:
Login to the target system with the administration rights, connect it to the data carrier and navigate to the folder which contains the exported key(s). Just double-click the REG files now and confirm the following request of Windows with ‘Yes’. Windows then integrates the structure into its own registry.
Note: You should be logged in as an administrator when dealing with the registry. Only then do you have access to all keys and values.
